Want quick and easy access to Linux on your Windows PC? The best option is to use the Windows Subsystem for Linux.
This gives you a Linux bash shell, a terminal window running in Windows. But how do you get this on Windows 10?
What Is the Windows Subsystem for Linux?
First included with the 2018 Windows 10 Anniversary Update and rolled out to all users in the Fall Creators Update, Windows Subsystem for Linux basically lets you run Linux software in Windows 10.
This is a feature that has been built into Windows. Unlike installing Linux in a virtual machine, the Windows Subsystem for Linux can be instantly called from the Start menu.
For this to work, however, you first need to enable the feature.
Once the Windows Subsystem for Linux is installed on Windows 10, you can run Linux in command line mode. This gives you access to the bash shell on your Windows PC!
Linux Bash Shell: For 64-Bit Windows 10 Only
Before you get started, make sure you’re running a 64-bit version of Windows 10. Sadly, the Windows Subsystem for Linux will not work on 32-bit systems. Check if your computer is running a 32-bit or a 64-bit version of Windows.
To check your computer for 64-bit compatibility, press WIN + I to open Settings, then System > About. Under “Device specifications” you’ll see the System type listed; for Windows Subsystem for Linux, this should read 64-bit operating system.

If not, you’ll need to upgrade your Windows 10 system from 32-bit to 64-bit. However, this will only work if you have 64-bit hardware.
How to Install Linux Bash Shell on Windows 10
Ready to install Bash on Windows? Start by clicking Start and entering “turn windows”. The Turn Windows Features on or off item should be displayed, so click this to open. Wait while the list is populated, then scroll down to Windows Subsystem for Linux.
This box should be checked. If it isn’t, add a check, then click OK to confirm.

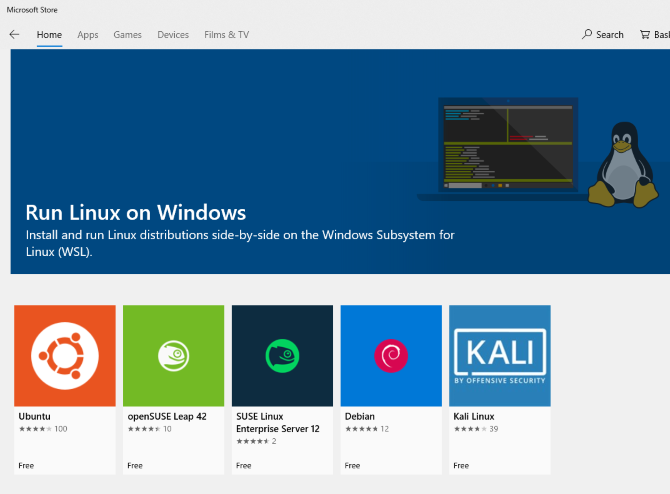
You’ll be prompted to restart Windows, so follow this instruction. Upon restarting, open Start > Windows Store. Use the search tool to find entries relating to “Linux” and select the first option, Run Windows on Linux.

Select your preferred Linux version to install. Whichever one you choose will determine the Bash experience. For example, if you select Kali Linux, you’ll be able to use commands specific to that operating system.
Install the Linux operating system, then wait. Once complete, click Launch from within the Windows Store or open it from the Start menu. On the first run, you’ll be prompted to input a username and password to create a user account.
Other methods are available to launch your chosen Linux environment. From the Start menu, you can enter:
- bash
- wsl
Both will display as a “Run command” that can be selected to instantly open Bash shell. The difference with using either of these methods is that they open in the /mnt/c/Windows/System32 directory. This means you can browse the System32 subdirectory in Windows 10.

Note that it is not possible to damage Windows 10 using the Linux environment. Any commands you input will damage only the Windows Subsystem for Linux and the chosen operating system. Windows 10 will remain safe and secure.
Also, you no longer need to enable the Windows 10 Developer Mode in Settings to run Bash.
How Does Bash Shell Terminal Differ from the Windows PowerShell?
With the Linux Bash shell running in Windows 10, you can input a variety of command line instructions.
But how does this differ from just using the Windows command prompt or PowerShell?
Well, naturally, both systems are quite different. With the PowerShell or command prompt, you’re limited to commands that are particular to Windows. This means, for example, using the dir command to view the contents of a directory; in Linux, the equivalent is ls.
Basically, the differences between Windows and Linux are what sets these two text environments apart. The advantage of having the Bash shell in Windows 10 is that you can easily access Linux within Windows. This saves time to setting up a virtual machine or rebooting into a dual boot installation of Linux.
What Can You Do With Bash in Windows 10?
With the Bash shell set up on Windows 10, you can use it as you would on a Linux PC.
Standard commands like help will show you how to use the preinstalled apps and tools. For example, apt help will demonstrate the usage of the package manager. You can use sudo apt update to get the latest packages, as you would on a Linux PC.

Similarly, the sudo apt upgrade command upgrades Linux to the latest version of the OS.
Meanwhile, other standard commands are available. You can check your network connectivity with ifconfig, check the current directory with pwd, and change to a different directory with cd.
You can also get a quick list of the last 10 inputs with the history command.
In short, it’s just like using Linux within the Windows 10 operating system.
Windows 10 and Linux: Working Together
Setting up the Windows Subsystem for Linux and accessing the Bash shell is easy. It’s also quicker than running a virtual machine, and far less complicated than relying on a dual boot.
To recap, all you need to do to run the Linux Bash shell on Windows 10 is:
- Check you’re using 64-bit Windows 10.
- Enable Windows Subsystem for Linux in the Windows Features screen.
- Install your chosen Linux environment from the Windows Store.
- Run Linux from the Start menu.
Meanwhile, almost all Linux commands can be used in the Bash shell on Windows. Bit rusty, or need some help? Check our downloadable guide to Linux command line tricks.
Read the full article: How to Get the Linux Bash Shell on Windows 10
Tidak ada komentar:
Posting Komentar